Please Wait...
1- يتم الدخول إلى الإعدادات Setting
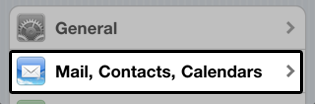
2- يتم اختيار Mail, Contacts, Calendars
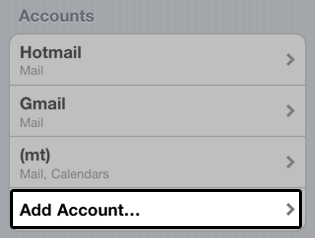
3- يتم اختيار Add Account
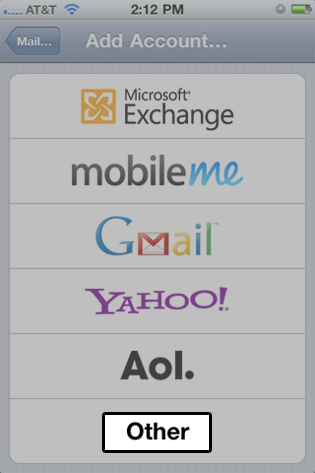
4- يتم اختيار Other من القائمة
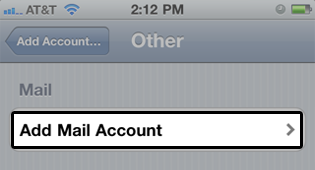
5- يتم اختيار Add Mail Account
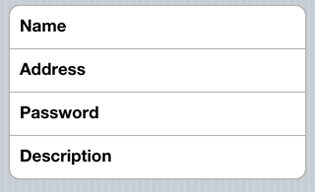
6- Name : يتم كتابة الاسم الذي سيظهر للمرسل إليه.
7- Address : يتم كتابة الإيميل الخاص بك، مثل : mail@example.com
8- Password : كلمة المرور الخاصة بالبريد.
9- Description : وصف الحساب.
7- Address : يتم كتابة الإيميل الخاص بك، مثل : mail@example.com
8- Password : كلمة المرور الخاصة بالبريد.
9- Description : وصف الحساب.
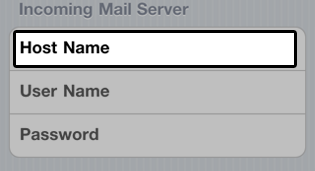
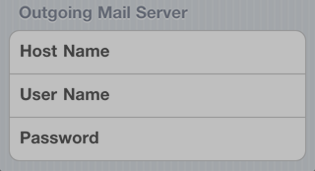
10- Host Name : يكون على الشكل التالي (mail.domain.com)
11- User Name : الإيميل الخاص بك، مثال : user@example.com
12- Password : كلمة المرور الخاصة بحساب البريد.
13- يتم كتابة نفس الإعدادات للخيارين Incoming Mail Server و Outgoing Mail Server
11- User Name : الإيميل الخاص بك، مثال : user@example.com
12- Password : كلمة المرور الخاصة بحساب البريد.
13- يتم كتابة نفس الإعدادات للخيارين Incoming Mail Server و Outgoing Mail Server
14- بعد الانتهاء من إعداد الحساب، يتم الضغط على Advanced
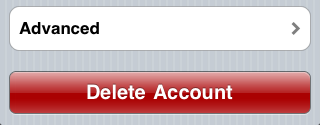
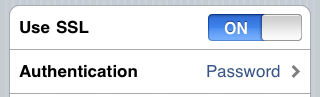
15- يتم التأكد من أن خيار Use SSL يشير إلى ON
16- التأكد من أن خيار Authentication على Password
16- التأكد من أن خيار Authentication على Password
ملاحظة : في حالة الرغبة في استخدام الاتصال الآمن (المشفر)، يرجى استخدام الهوست نيم الخاص بالسيرفر بدلًا من نطاق موقعك، مثل unlimited1.dimofinf.net